Geotagging Images in Lightroom

This post explains geotagging in Lightroom, the process of adding location metadata to images. Geotagging is a significant part of my photography workflow. Lightroom's full integration with Google Maps is one of my favourite features. Maps inspire me. There's always another remote road to drive, spectacular vista to encounter, and enticing trail to hike.

Aside from its "cool" factor, geotagging is useful because it's one of the main ways I search for images. I also search based on the date an image was taken (thanks to my folder and file structure) or based on an image's subject (after I've added keywords, which I'll write about in a separate post).

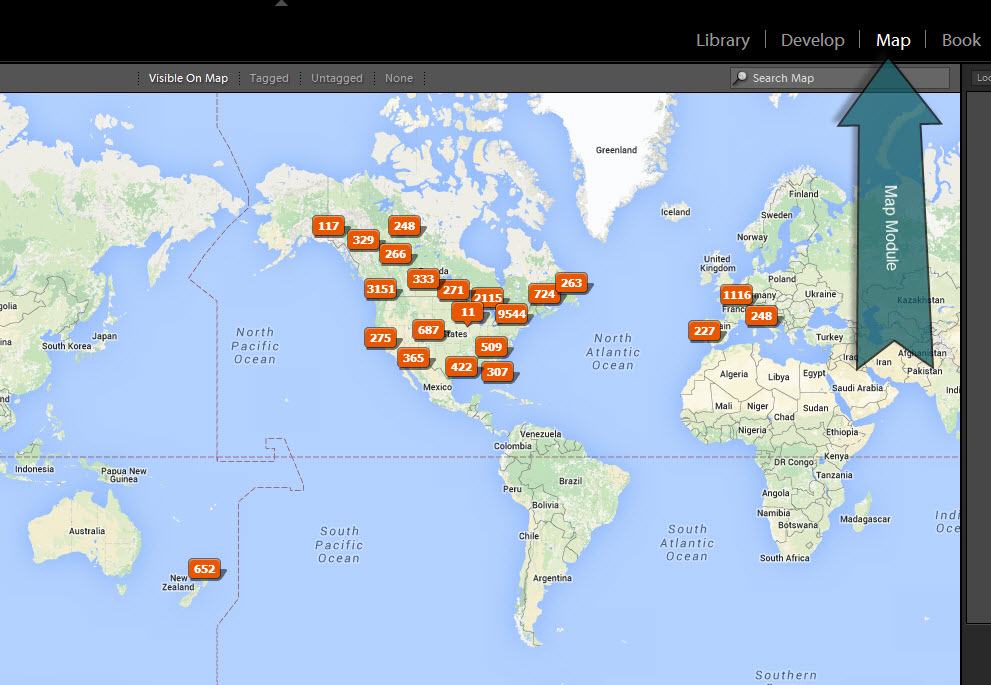
Geotagging is done in Ligthroom's Map module. After you've geotagged your images, that module displays a map with pins showing where your images were taken:

Lightroom's Map module, showing where my images were taken

Lightroom's Map module, showing where my images were taken

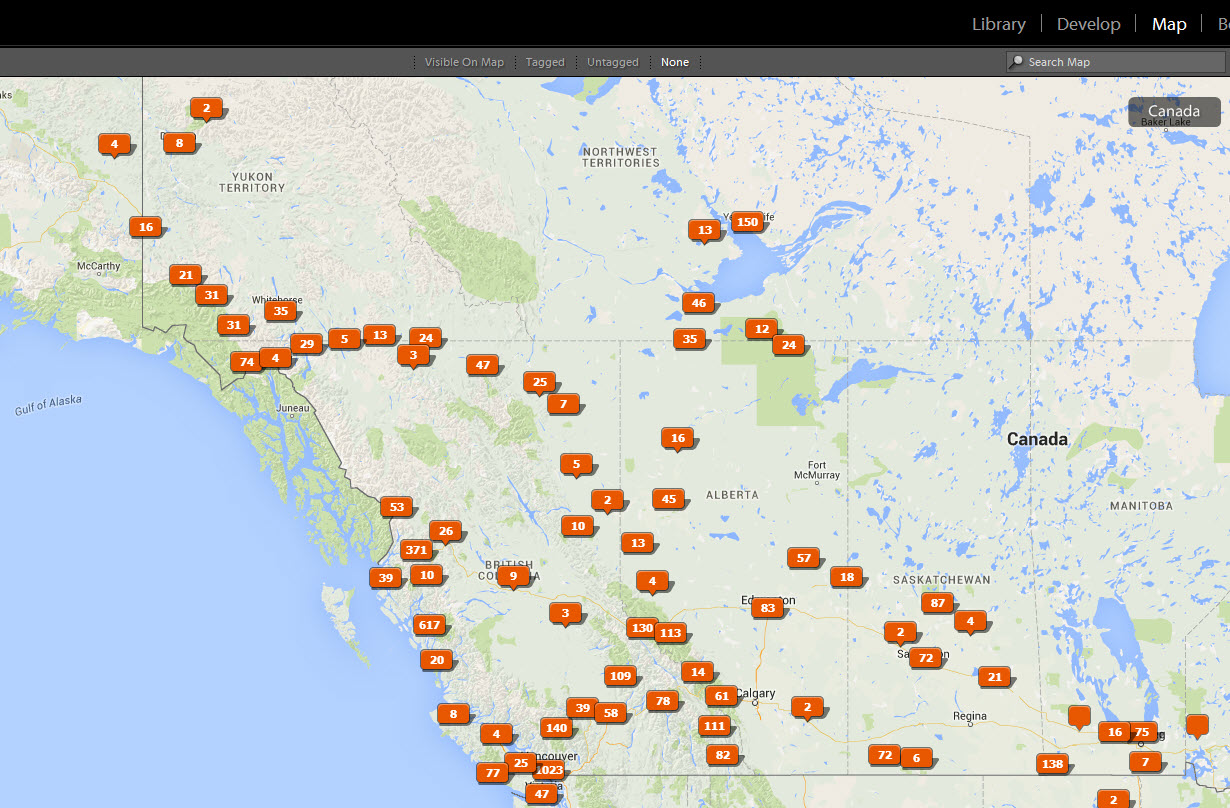
Given my residence, it's not surprising that most of my images were taken in North America. You can zoom in on the map to see more detail:

LIGHTROOM'S MAP MODULE, SHOWING WHERE MY IMAGES WERE TAKEN in western Canada and the Territories

LIGHTROOM'S MAP MODULE, SHOWING WHERE MY IMAGES WERE TAKEN in western Canada and the Territories

You can click on the markers to highlight the images taken at that location but the coolest feature is Lightroom's ability to show you only those images that were taken on the visible area of the map. For example, suppose I want to find the images I took near Stewart, British Columbia. If I remembered when I was there, I could browse my folders by year and date. If I don't remember when I was there, I can type "Stewart, BC" into the location search box, zoom as appropriate, and then click on Visible on Map to enable that filter:

Lightroom's "Visible on Map" FEature

Lightroom's "Visible on Map" FEature

Amazing! Only the 26 images visible on the map are selected. I can then navigate to the folder by right-clicking on any image and selecting Go to Folder in Library.

Instructions

Some cameras (such as the Canon 6D) can automatically add location metadata to every image. However, I turn that feature off because it uses a lot of battery power (even when the camera is turned off). It's so easy to geotag in Lightroom that I don't feel that I'm missing anything. If I'm at a location that I think might be hard to remember, I can always take a photo with my iPhone and have it record the location without wasting my camera's battery.

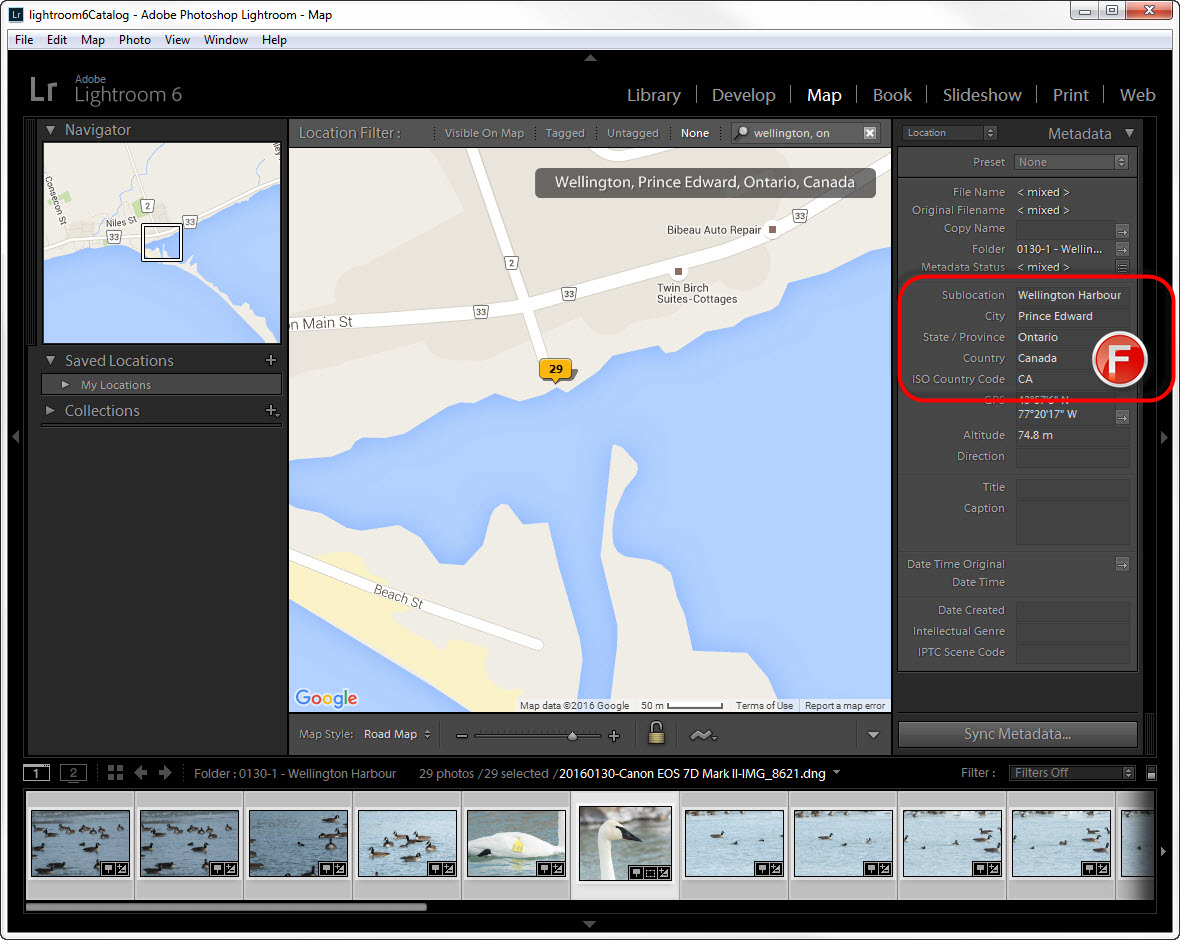
The following screenshot shows Lightoom's Map module and identifies the features that let you geotag images:

Geotagging in Lightroom: Suggested Location Metadata

Geotagging in Lightroom: Suggested Location Metadata

To geotag images in Lightroom:

  1. Switch to the Map module (A).
  2. Select all images taken at a location (B). My folder structure makes this easy. In the screenshot, I'm in a folder where all images were taken at the same location (Wellington Harbour) so I can Edit→Select All.
  3. Use the search box (C) and/or change the map style (D) to zoom to the exact location.
  4. Right-click on the map where the images were taken and select Add GPS Coordinates to Selected Photos. This should provide suggestions for ISO Country Code, Country, State/Province, City, and Sublocation. Suggestions appear in light grey (E). If suggestions don't appear, you need to enable the feature: In Edit→Catalog Settings→Metadata, make sure that Lookup city, state, and country of GPS coordinates to provide address suggestions is checked.
  5. Confirm the suggestions by clicking on the field name (such as ISO Country Code) and selecting the correct value.
  6. Manually enter a sublocation. For example, I want the sublocation for these images to be Wellington Harbour rather than the suggested Bloomfield.

After values are entered into a location field (either by confirming a suggestion or manually entering a value), the light grey text turns white (F):

GEOTAGGING IN LIGHTROOM: ConfirmED LOCATION METADATA

GEOTAGGING IN LIGHTROOM: ConfirmED LOCATION METADATA

Voila! You're done! Wasn't that easy? Now you can browse Lightroom's map, marvel at the places you've been, and dream of where to go next!
Importing Images to Lightroom

This post describes how I import images to Adobe Lightroom. It's a vital part of my photography workflow.

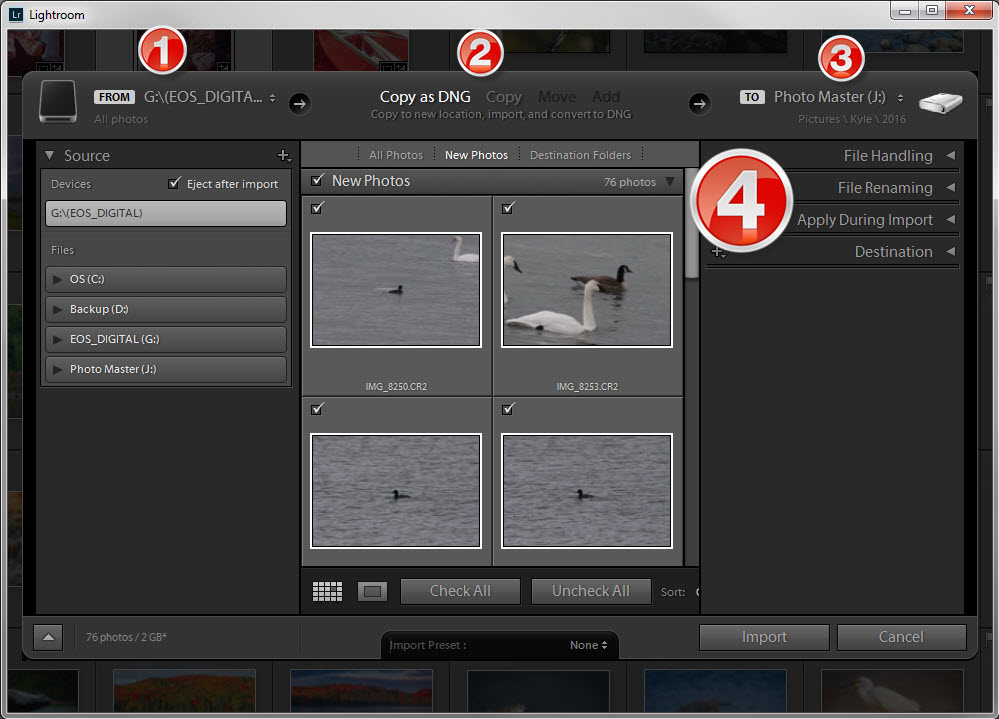
Lightroom's Import button is only available in the Library module, so I go there and click it to open the Import Dialog:

Adobe Lightroom's IMPORT DIALOG

Adobe Lightroom's IMPORT DIALOG

The Import Dialog has four main sections:

  1. Source
  2. File Manipulation
  3. Destination
  4. Option Panels

Each section is explained below.

Source

I select the drive of my camera's memory card and check the box that ejects the drive after the import is complete. As soon as the import is complete, I put the card back in my camera to minimize the chance of in-the-field-with-no-memory-card-in-my-camera syndrome.

File Manipulation

I select to copy as DNG unless I expect to delete many photos. In that case, it's more efficient to copy the files as is first, delete the ones I don't need and then convert the remaining files to DNG.

Destination

I select the folder for the correct year on the Photo Master external hard drive. Click here for details on the folders and files I use to keep my images organized.

Option Panels

File Handling

Adobe Lightroom's Import Dialog: FILE HANDLING PANEL

Adobe Lightroom's Import Dialog: FILE HANDLING PANEL

I select the following in the File Handling panel:

  • Build 1:1 Previews - I prefer to build 1:1 previews during the import process to minimize delays during development.
  • Don't Import Suspected Duplicates - I don't want a second copy if an image is already in the Lightroom catalog.
  • Make a second copy - I make a backup copy during the import process in case I mistakenly delete a file. Click here for more details on my backup workflow.

File Renaming

ADOBE LIGHTROOM'S IMPORT DIALOG: FILE RenamING PANEL

ADOBE LIGHTROOM'S IMPORT DIALOG: FILE RenamING PANEL

In the File Renaming panel, I select the following:

  • Template - I rename files using a template that includes the date each image was taken, the camera body used to take it, and the filename as recorded by the camera. Click here for details on the folders and files I use to keep my images organized.
  • Make extensions lowercase - This is a personal preference - I don't want my file extensions yelling at me.

Apply During Import

ADOBE LIGHTROOM'S Apply During Import PANEL

ADOBE LIGHTROOM'S Apply During Import PANEL

In the Apply During Import panel, I select the following:

  • Develop Settings - I use a develop preset to automatically apply my most frequently-used edits to every image - adding clarity, vibrance, saturation, and sharpening; reducing noise; enabling profile corrections, and removing chromatic aberration.
  • Metadata - I use a metadata preset that adds my name, city, website, email address, and copyright details into every image. Doing so makes it slightly easier to catch someone who uses one of my images without my permission.

Destination

ADOBE LIGHTROOM'S IMPORT DIALOG: Destination PANEL

ADOBE LIGHTROOM'S IMPORT DIALOG: Destination PANEL

In the Destination panel, I select that images get put into a subfolder and are organized into one folder. Click here for details on the folders and files I use to keep my images organized.

Backup Workflow

Let's talk about everyone's favourite topic - backup. Wait? Backup isn't your favourite topic? Tough cookies! It's something you've got to do. How would you ever forgive yourself if you lost that blurry photo of the most common bird in the world? I think Abraham Lincoln said it best: There are those who have experienced hard drive failure and those who will experience hard drive failure.

External Hard Drives

I use five external hard drives:

  • master drive
  • onsite backup drive
  • offsite backup drive #1
  • offsite backup drive #2
  • travel drive

Master Drive

This drive is permanently connected to my home computer and stores raw image files and my Lightroom catalog. (Click here for an explanation of the folders and files I use to keep my images organized.)

The master drive is where images are imported when I return from taking photos. (Click here for my photography workflow.) If I didn't take my laptop (such as on a day trip), raw image files are imported directly from the memory card on my camera. If I took my laptop, images are exported as a Lightroom catalog from the travel drive (see below) before the catalog is imported to the master drive.

Onsite Backup Drive

This drive is permanently connected to my home computer and stores backup copies of everything I value. I use Windows Task Scheduler to ensure that my data is automatically backed up every night by SyncToy, a free tool you can download from Microsoft.

SyncToy uses pairs of folders (called the left and right) and actions (synchronize, contribute, or echo). The action defines how changes on the left folder are reflected on the right folder. For backup, use an action of echo to ensure that all changes to the master data appear on the backup drive.

I have four SyncToy folder pairs - one each for the daily backup of my photography files, video files, music files, and other data files.

Offsite Backup Drives

At the end of each month, I manually create on-the-fly SyncToy folder pairs with an action of echo to copy to an offsite backup drive the same files that are backed up to the onsite backup drive. After the monthly backup is complete, I swap the backup drives. The newly created one is stored offsite; the one that was offsite is brought home to prepare for the next monthly backup.

It's important to keep a backup offsite. Otherwise, you have a single point of failure - you're susceptible to theft, fire, and other natural disasters. At the very least, keep the offsite backup drive in a different room than the main computer.

Online Backup

I once used an online backup service that backed up my most important data to "the cloud". However, I stopped using it for several reasons:

  • The service was more expensive per year than the cost of several external hard drives that will last for many years. That doesn't count the additional cost for bandwidth when I exceeded my monthly upload limit after returning from a long trip.
  • The amount that could be backed up was limited so I constantly had to redefine what data was most important.
  • It slowed down my computer.
  • It would have taken too long to get my data back after a disaster. If disaster occurs, I can just pick up my offsite backup drive and copy the data to a new computer. With backups on the cloud, I would either need to download everything (slow and possibly costly) or arrange for my data to be mailed.

All that being said, I keep my offsite backups in the same city as my home computer so my backup plan leaves me susceptible to city-wide destruction. I choose not to worry about such things. If my city is destroyed, I'll lose my raw files and my Lightroom catalog but at least high-resolution JPEG images will be available on SmugMug (see below).

Travel Drive

When I travel with my laptop, I take a special drive to ensure that the drives at my home remain pristine. The travel drive is also sturdier to withstand the rigors of travel. On-the-fly SyncToy folder pairs with an action of echo are used to populate the travel drive before I leave on a trip.

When travelling, I use Lightroom on my laptop to import image files to the travel drive and use Lightroom's "Make a second copy during import" option to backup the raw files to my laptop's hard drive. Even with raw images stored on three locations (camera, travel drive, and laptop hard drive), I still have a single point of failure because I keep all of those items in my car. If it was stolen or caught fire, I would lose all my images. To eliminate that single point of failure, I do the following:

  • Bring several SD cards, envelopes, and stamps when I travel.
  • Periodically export my latest images as a Lightroom catalog to an SD card.
  • When an SD card is close to full, mail it to my house. When I get home, the backup SD cards are already there if I need them.

Once home, I use Lightroom to export as a catalog the folder on the travel drive that has images from my trip. I then use Lightroom to import that catalog to my master drive.

Other Backup Concerns

SmugMug

I post all of my images to SmugMug, a photo-sharing website and image hosting service. SmugMug doesn't accept raw files so I post my images as high-resolution JPEG files instead. Lightroom's SmugMug plugin makes this really easy - it creates JPEG files on-the-fly so I don't need to store them anywhere. Once the JPEG files are uploaded to SmugMug, poof! They're gone.

My SmugMug galleries mimic the folder structure on my master drive. There's a top-level folder for each year and a gallery for each event that year. These galleries are private; a person requires a link from me to see them. For example, if I have images of a bird that I can't identify, I send the link to more experienced birders.

Lightroom Catalog Backups

I configure Lightroom to prompt me to back up my catalog every time I exit the program (Edit→Catalog Settings→General→Backup). This backup takes a while so I ignore the prompt most of the time. However, it serves as a reminder to back up the catalog at least once a week. I've never had to use this backup (because the catalog is included in my nightly backup), but you can never have too many backups!

Lightroom Presets Storage

I configure Lightroom to store my presets with my catalog (there's a checkbox under Edit→Preferences→Presets→Location). That way, the work I've spent defining presets (for example, those for developing, adding metadata, and renaming files) isn't lost if my computer dies or I need to reinstall Lightroom.

This approach works for me because I only use one Lightroom catalog. If you use presets that apply to more than one catalog, you need a different approach.

Google Drive

I use Google Drive extensively. It's a fantastic file storage and synchronization service that automatically saves changes to the cloud as you type. It allows you to create spreadsheets, word processing documents, presentations, drawings, maps, and other files using only a web browser (there's no need for external programs like Microsoft Word or Microsoft Excel). Google Drive has several enormous benefits:

  • You never need to back up its files - they are automatically saved on the cloud as you type.
  • Files are automatically synchronized between devices. If you install Google Drive on all your devices, changes you make on one device automatically appear on the others. For example, I create a Google Sheet (the Google Drive equivalent of a Microsoft Excel spreadsheet) to plan potential stops on a trip. If I edit the document on my computer, I automatically see those changes on my laptop (or even on my phone).

Summary

That's how I ensure that I don't lose images. If you have any suggestions on backup, please comment here or contact me.

Photography Workflow

Here's my photography workflow. Your mileage may vary. I'll describe the steps in further detail in other posts.

Remember, images aren't going to organize themselves! It's a good feeling when you can easily find that picture of grandma in a onesie doing a handstand.

  1. Go somewhere. Leave the warm place where your computer is. Maybe go outside. It'll be okay. I promise.
  2. Using your camera, clear the memory card. Only do this when you're sure that the images have already been copied to your computer and backed up. I've written a detailed post on my backup workflow.
  3. Take photos. If the camera supports it, shoot raw. Learn to move away from automatic mode - see my image-taking workflow.
  4. Go back to where your computer is. Ah, the indoors. So warm. So safe. So filled with a computer.
  5. Remove the card from the camera. I know that you can attach your camera to the computer using a fancy cable, but that wastes your camera's battery. Only turn on your camera when you're going to use it to capture stunning images of subjects such as that decaying house plant in the corner.
  6. Import the images to Lightroom. Copy the files rather than move them; keep the originals on the memory card as a backup until you are absolutely certain that you have other backup copies, and preferably an offsite backup. I've written detailed posts on importing images to Lightroom and my backup workflow.
  7. Put the card back in the camera. This step might seem obvious but it's no fun when you forget. 100% of my sasquatch encounters have occurred when my camera's memory card was in my computer.
  8. Organize images in Lightroom. Delete photos that you will never need (Be careful! I once deleted blurry images of a rare bird that will likely never be seen again. My photos could have helped with the identification.) Create new folders to keep files organized. I've written a detailed post on the folders and files I use to keep my images organized.
  9. Edit images in Lightroom. Do whatever you do to make your images worthy of publishing. Maybe increase exposure in the shadows, decrease exposure in the highlights, or add an amount of saturation that will later seem as subtle as a sledgehammer.
  10. Add keywords to images in Lightroom. How else are you going to find those images of that weird lizard you took two years ago?
  11. Geotag images in Lightroom. How else are you going to find those photos you took at that awesome sewage lagoon in northern Ontario? I've written a detailed post on geotagging images in Lightroom.
  12. Flag the very best images. Flagging the best images makes it easier to find them later.
  13. Publish images to SmugMug from Lightroom. How else are your adoring fans going to see your work?
  14. Use Lightroom collections. For example, I have one collection for my all-time favourite bird images, another for my favourite mammal images, and another for my favourite scenery images.

Finding Images

Thanks to the above workflow and Lightroom's features, I have many ways to find images:

  • Browse folders by year and event
  • Filter to only show flagged photos
  • Search by keyword in Lightroom's Library module
  • Search by location in Lightroom's Map module
  • Browse my Lightroom collections
  • Use Lightroom's on-the-fly Quick Collection
  • Use a Lightroom smart collection. I have a temporary smart collection that I edit when I want to combine search critera. For example, suppose I want to find flagged bear images taken with a slow shutter speed. That's three criteria:
Using a Lightroom Smart Collection to find flagged bear images taken with a slow shutter speed

Using a Lightroom Smart Collection to find flagged bear images taken with a slow shutter speed