Review: Sleeklens Lightroom Workflows

DISCLAIMER: I was provided the products under review for free. This did not impact the review.

This is a review of two Lightroom Presets packages from Sleeklens:

Sleeklens also has Lightroom tutorials on their website.

What You Get

Each package comes with presets and brushes that integrate directly into Lightroom. The Through the Woods Workflow package has 50 presets and 30 brushes; the Aura Laborar Night Workflow package has 122 presets and 10 brushes.

Presets and brushes differ in how much of the photo they impact. Presets apply changes to an entire photo; brushes apply changes only to specified areas of a photo.

Installation

Installation was a breeze. Each package comes as a compressed ZIP file with two folders - one for presets and one for brushes. You extract each folder to a special place (clearly explained in Sleeklens's instructions) so that Lightroom knows where to find them.

You can copy the presets and brushes into Lightroom's installation hierarchy so that they are available in every catalog or into a specific catalog. I have all my photos in a single catalog so I chose the latter so that the presets and brushes are automatically available when I edit photos in the catalog on another computer.

Pros & Cons

The presets provide a very fast way to see what different effects would look like on a photo. As you move the cursor over each of the presets, you see in the navigator what the photo would look like with that preset applied.

The brushes allow you to apply edits only to specific areas of a photo. For example, if you have a photo of a woman in a red dress and a red building, you may want to brighten the dress while not impacting the building of the same colour.

One complaint I have is about the names of the presets and brushes. For example, it's hard to know what a brush named "Top Secret" will do to a photo and it's hard to distinguish the difference between brushes named "Punchy" and "Punch It Up" (which both exist in the Through The Woods package).

Summary

These are good tools for any Lightroom photo editor. I will use Sleeklens presets as a starting point in my photo editing. Once applied, I will fine tune the develop settings and use Sleeklens brushes to achieve the final result.

Keeping Images Organized: Folders & Files

This post demonstrates the folders and files I use to keep my images organized.

I do everything related to image files (such as creating folders and moving image files) from within Adobe Lightroom. I’ll cover how in another post. This post shows what things look like after using Adobe Lightroom. Let’s start by looking at my photo master external hard drive in Windows Explorer:

The contents of the top-level of my photo master external hard drive (J:).

The contents of the top-level of my photo master external hard drive (J:).

At the top level, the drive has two folders, one for my Lightroom catalog and one for my picture files. There’s also a funny-looking file that Microsoft SyncToy uses to keep track of things. SyncToy is the key component of my backup strategy and I'll cover that in another post. In this post, we’ll only look inside the Pictures folder:

The contents of J:\Pictures

The contents of J:\Pictures

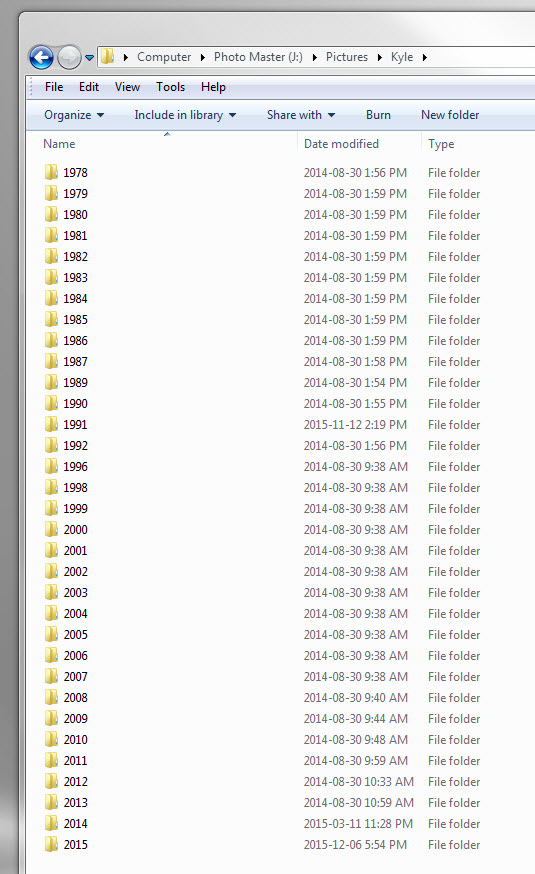
Within the Pictures folder, I use one top-level folder for each photographer. We’ll focus on images that I’ve taken, in the Kyle folder:

The contents of J:\Pictures\Kyle

The contents of J:\Pictures\Kyle

In the Kyle folder, I use one subfolder for each year. Note that I don't let Lightroom decide on my folders. I move my files around manually because I want the folder to represent when the image was originally taken. For example, if I scan an image from 1987, I want the folder to be 2016 (which Lightroom would think to use) and not 1987.

Within each year’s subfolder, I use further subfolders for each location:

The contents of J:\Pictures\Kyle\2015

The contents of J:\Pictures\Kyle\2015

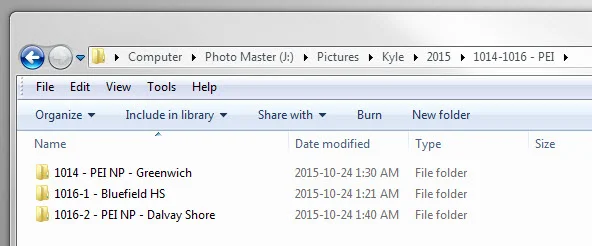
For example, I was in Manitoba on October 26, 2015, so I have a folder named 1026 - MB within the 2015 folder. If one trip has many locations, I use further subfolders. For example, I was in Prince Edward Island (PEI) from October 14-16, 2015, so I have a folder named 1014-1016 - PEI within the 2015 folder:

The contents of J:\Pictures\Kyle\2015\1014-1016 - PEI

The contents of J:\Pictures\Kyle\2015\1014-1016 - PEI

I took images at three locations in Prince Edward Island, so that folder contains three subfolders.

I use two digits for the month followed by two digits for the day so that folders always appear in chronological order even when sorted alphabetically. For example, I use 0117 for January 17 and 0308 for March 8. When a day has more than one location, I put a number after the date to indicate the order. For example, I took images at two locations in PEI on October 16, so I have folders that start with 1016-1 and 1016-2. The numbers after the date ensure that these subfolders always appear in chronological order.

Files

Now that we’ve talked folders, let’s talk files. Each folder contains DNG (digital negative) files. I use Canon camera bodies, shoot raw (You should too if you can!), and use Lightroom to convert from Canon's proprietary CR2 raw format to the non-proprietary DNG raw format. Here's a folder that holds images I took on January 3, 2016 on Amherst Island:

The contents of J:\Pictures\Kyle\2016\0103 - Amherst Island

The contents of J:\Pictures\Kyle\2016\0103 - Amherst Island

Filenames have the format DATE-CAMERA_BODY-IMG_XXXX:

DATE is in the format YYYYMMDD where YYYY is the year, MM the month, and DD the day when the image was taken. Given my folder structure, it may seem redundant to include a date in the filename but doing so has several benefits:

  • It avoids filename conflicts when images are combined into a single folder (for example, when exporting a Lightroom collection). My cameras roll over image numbers every 10000 images so without a date, I would have more than one file named IMG_1234.CR2.
  • It ensures that image files appear in chronological order when they are arranged alphabetically in a single folder.
  • It allows you to simultaneously see the date of an image and the image's metadata such as shutter speed, aperture, and ISO in Lightroom's Loupe Info Overlay.

CAMERA_BODY records the camera body used to take the image. For example, Canon EOS 7D Mark II appears when an image was taken with that camera body. This is done to avoid filename conflicts if I happen to take two images on the same day with two different camera bodies that have the same image number. Without including the camera body in the filename, I could end up with two files named 20150117-IMG_1234.CR2. It’s unlikely but possible and I need a workflow that always works, not one that almost always works. Note that I will need to adopt a different naming convention if I ever have two camera bodies of the same model. If that happens, I could use the camera's serial number but that approach doesn't work with images taken on my iPhone.

IMG_XXXX is the filename created by the camera.

Note that filenames don't indicate the subject of an image (such as an animal species, person, or location) or where the image was taken. Instead, I use Lightroom keywords to record which people and animals are in my photos and Lightroom geotagging to record where my photos were taken. I'll discuss both in another post.